Landmarks
Facial landmark detection provides precise localization of facial features.
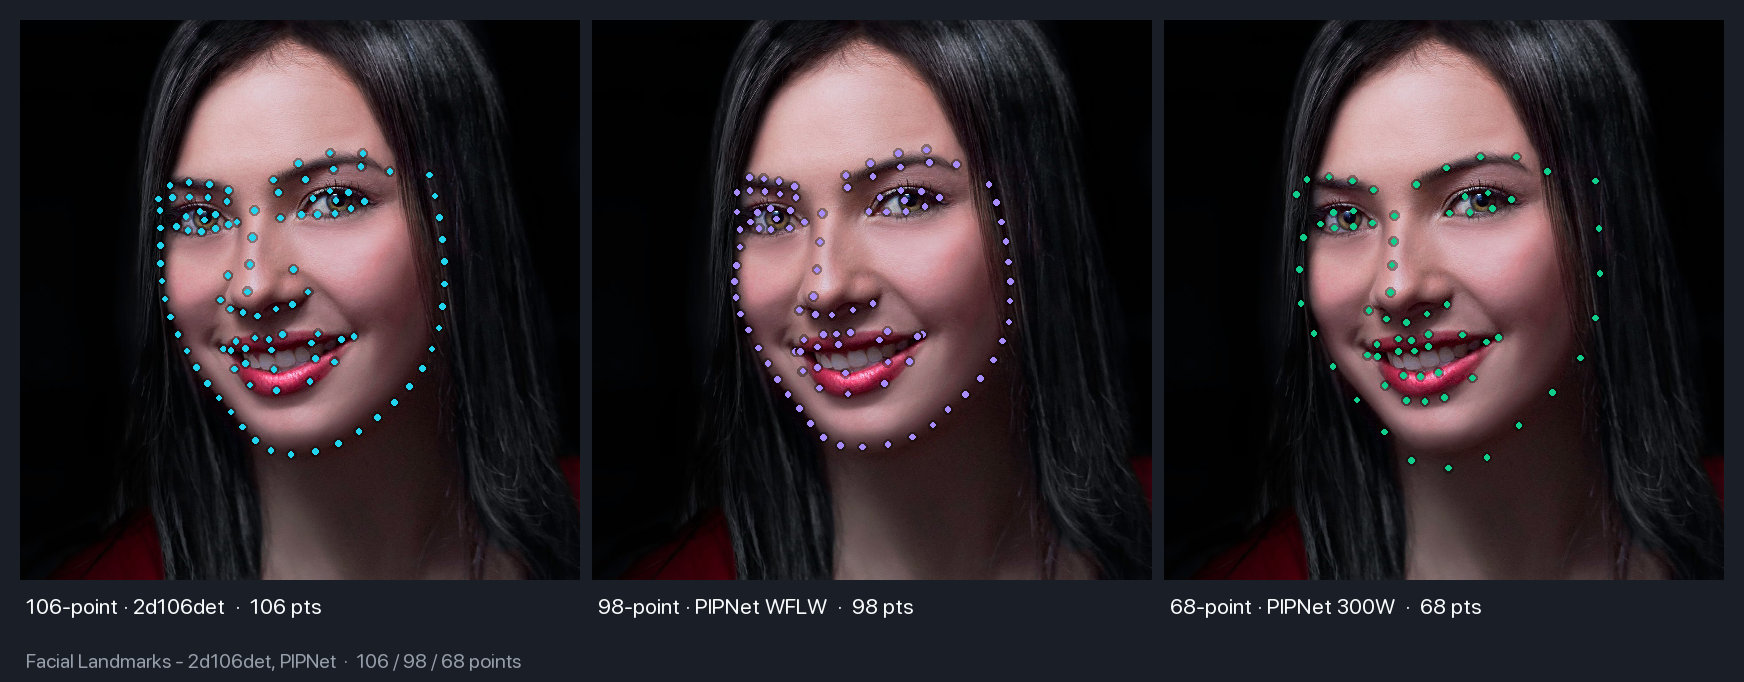
Available Models
| Model | Points | Size |
|---|---|---|
| Landmark106 | 106 | 14 MB |
| PIPNet (WFLW-98) | 98 | 47 MB |
| PIPNet (300W+CelebA-68) | 68 | 46 MB |
FaceMesh (V1_468) |
468 (3D) | 2.4 MB |
FaceMesh (V2_478) |
478 (3D, with irises) | 4.6 MB |
5-Point Landmarks
Basic 5-point landmarks are included with all detection models (RetinaFace, SCRFD, CenterFace, YOLOv5-Face, YOLOv8-Face). BlazeFace is the exception — it returns 6 MediaPipe keypoints instead; see Detection.
106-Point Landmarks
Basic Usage
from uniface.detection import RetinaFace
from uniface.landmark import Landmark106

detector = RetinaFace()
landmarker = Landmark106()

# Detect face
faces = detector.detect(image)

# Get detailed landmarks
if faces:
    landmarks = landmarker.get_landmarks(image, faces[0].bbox)
    print(f"Landmarks shape: {landmarks.shape}")  # (106, 2)
Landmark Groups
| Range | Group | Points |
|---|---|---|
| 0-32 | Face Contour | 33 |
| 33-50 | Eyebrows | 18 |
| 51-62 | Nose | 12 |
| 63-86 | Eyes | 24 |
| 87-105 | Mouth | 19 |
Extract Specific Features
landmarks = landmarker.get_landmarks(image, face.bbox)

# Face contour
contour = landmarks[0:33]

# Left eyebrow
left_eyebrow = landmarks[33:42]

# Right eyebrow
right_eyebrow = landmarks[42:51]

# Nose
nose = landmarks[51:63]

# Left eye
left_eye = landmarks[63:72]

# Right eye
right_eye = landmarks[76:84]

# Mouth
mouth = landmarks[87:106]
PIPNet (98 / 68 points)
PIPNet (Pixel-in-Pixel Net) is a high-accuracy facial landmark detector. UniFace ships two ONNX variants that share a ResNet-18 backbone and 256×256 input — the only difference is the number of points and the dataset they were trained on.
Basic Usage
from uniface.detection import RetinaFace
from uniface.landmark import PIPNet

detector = RetinaFace()
landmarker = PIPNet()  # Default: 98 points (WFLW)

faces = detector.detect(image)
if faces:
    landmarks = landmarker.get_landmarks(image, faces[0].bbox)
    print(f"Landmarks shape: {landmarks.shape}")  # (98, 2)
68-Point Variant (300W+CelebA, GSSL)
from uniface.constants import PIPNetWeights
from uniface.landmark import PIPNet

landmarker = PIPNet(model_name=PIPNetWeights.DW300_CELEBA_68)
landmarks = landmarker.get_landmarks(image, face.bbox)
print(landmarks.shape)  # (68, 2)
The 68-point 300W variant places its jaw contour more loosely than the other two, with outline points that can drift off the silhouette. If you need a tight face boundary, prefer the 98-point WFLW variant or the 106-point model.
Notes
- The number of landmarks is read from the ONNX output and the matching meanface
table is selected automatically — there is no
num_lms=argument. - PIPNet uses an asymmetric crop around the bbox (+10% left / right / bottom, −10% top) and ImageNet normalization. This is handled internally.
- Output landmarks are in original-image pixel coordinates as
float32.
Face Mesh (468 or 478 points, 3D)
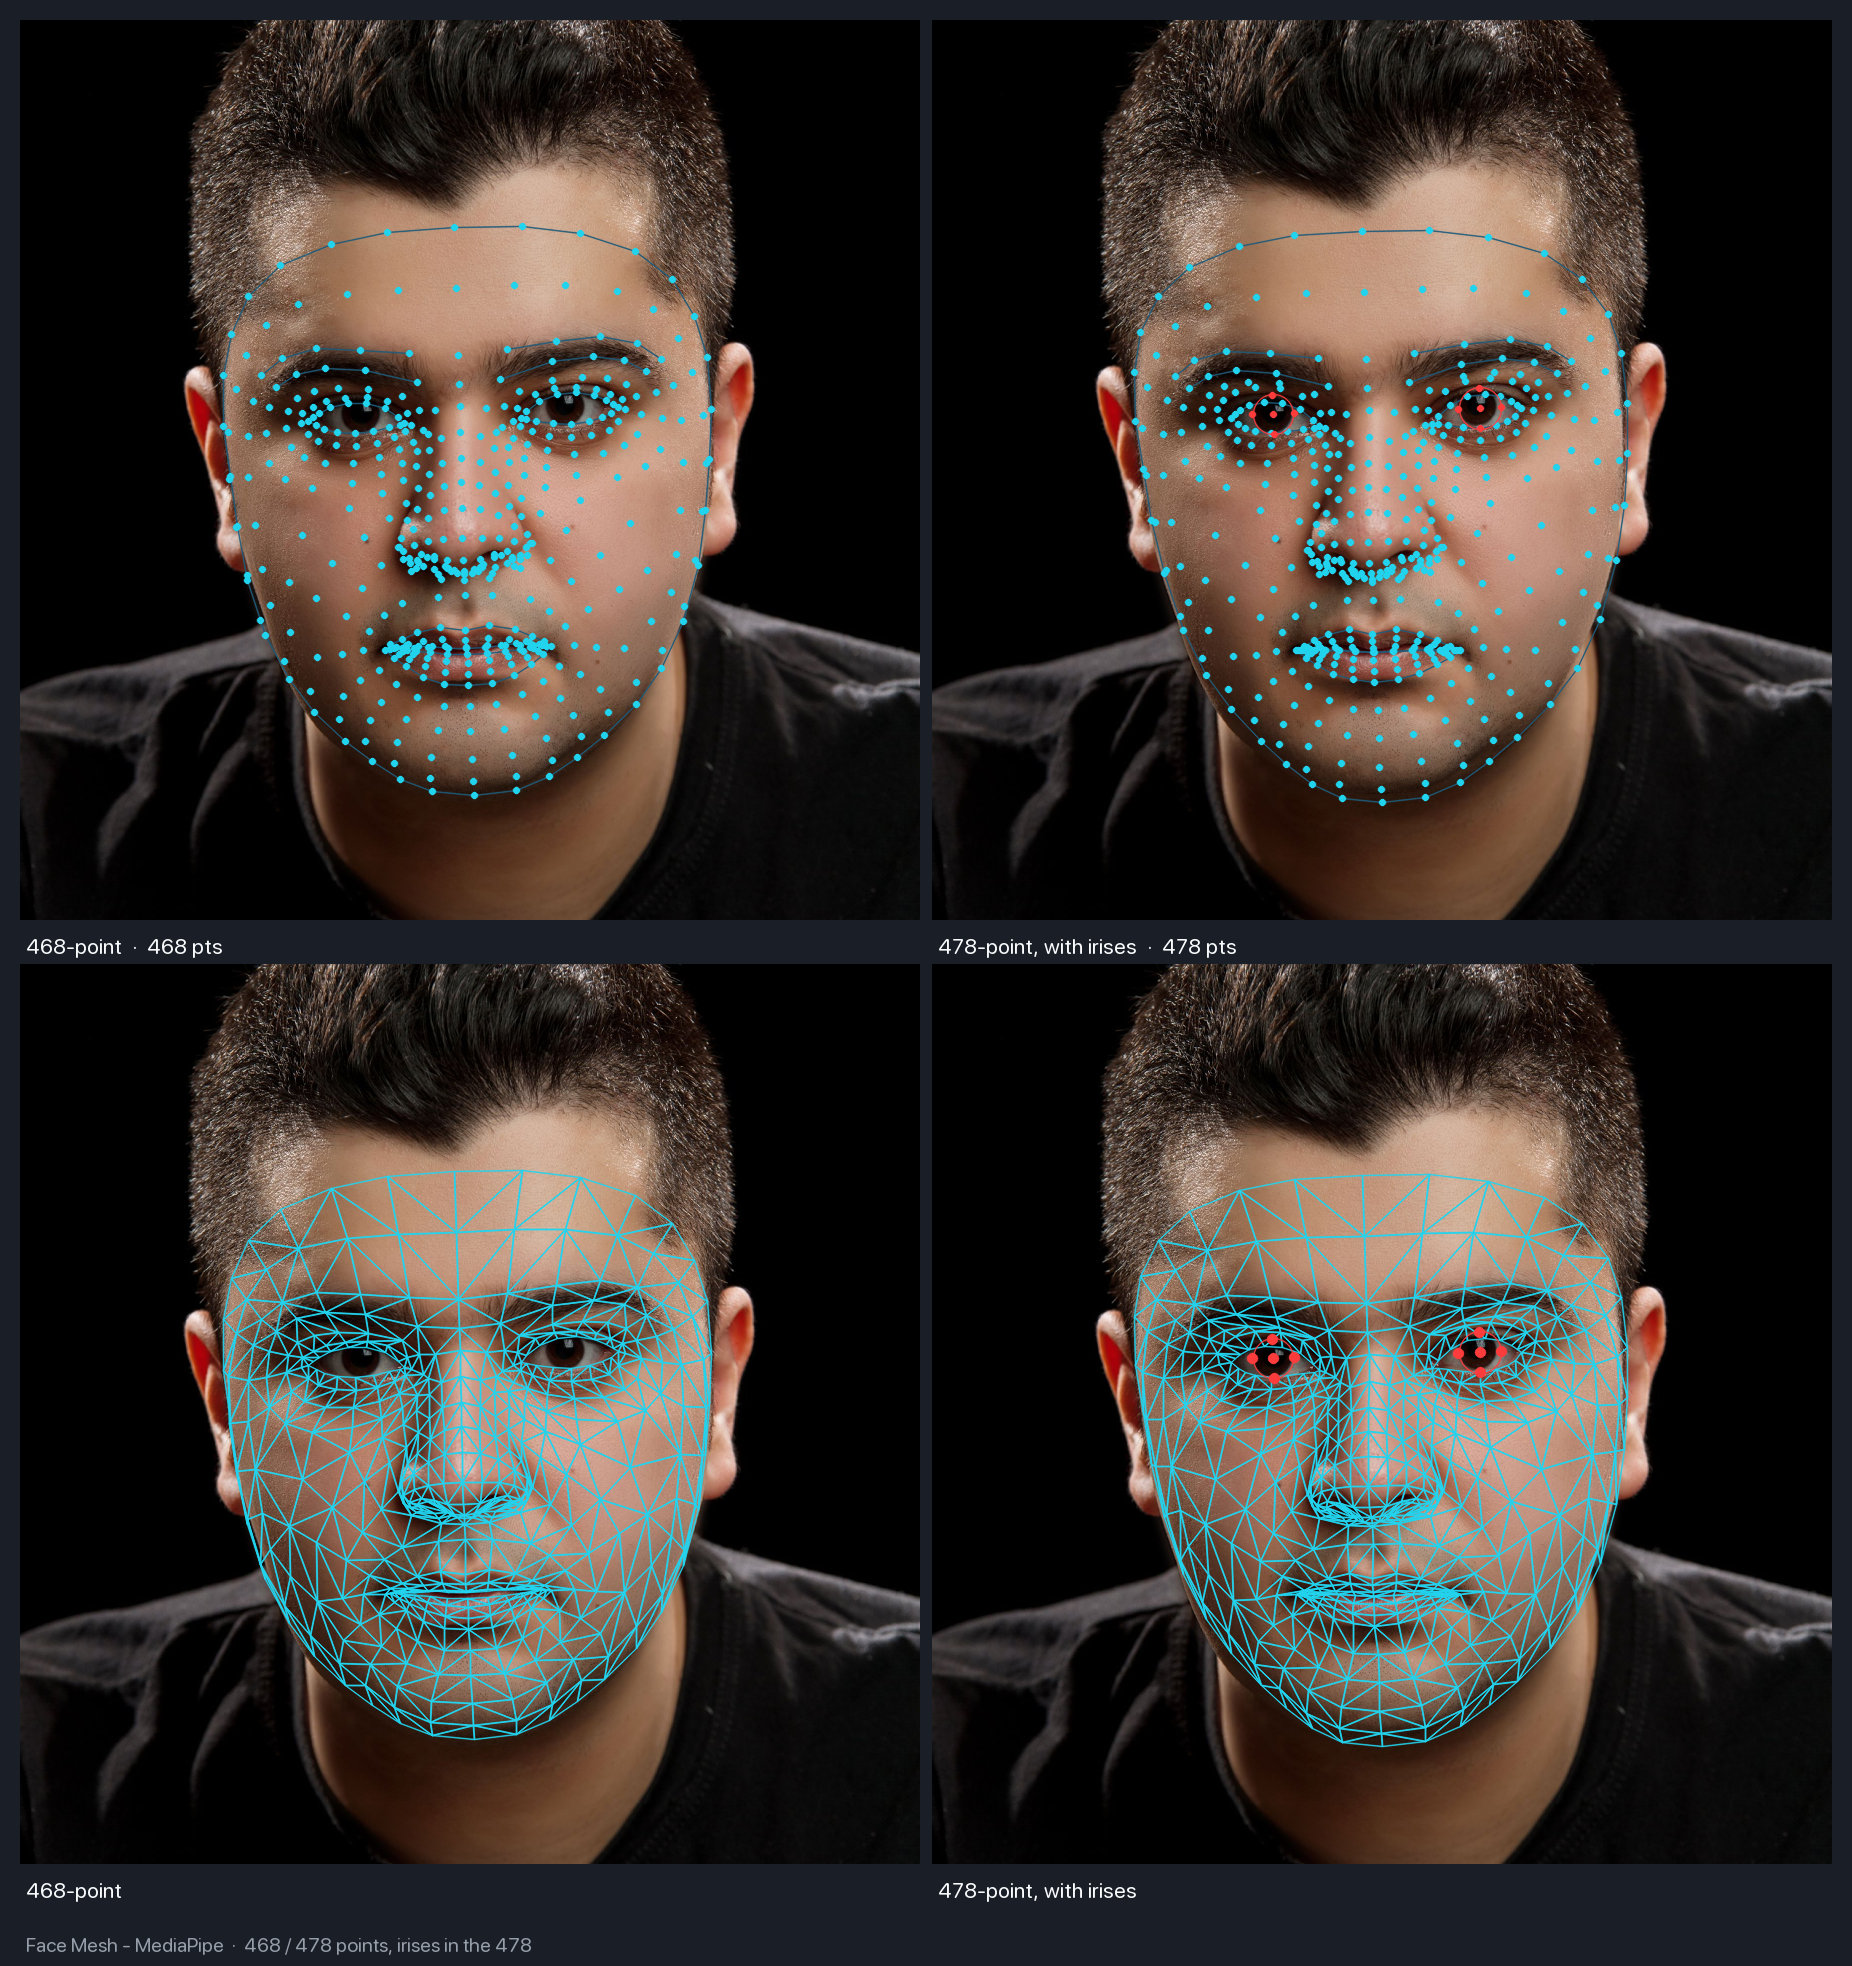
Google MediaPipe's dense mesh. Unlike the other landmarkers it returns 3D points and a face-presence score, and it processes every face in an image in a single batched inference call.
Basic Usage
Works with any detector — it needs a bounding box, plus the first two landmarks (the eyes) to align the crop:
from uniface import SCRFD, FaceMesh

detector, mesher = SCRFD(), FaceMesh()

faces = detector.detect(image)
results = mesher.predict(image, faces)   # one batched call for all faces

results[0].landmarks.shape   # (468, 3) — x, y in image pixels; z is relative depth
results[0].points_2d.shape   # (468, 2) — depth dropped
results[0].score             # face presence, [0, 1]
Without a detector, pass boxes directly:
Iris landmarks
V2_478 is MediaPipe's Face Landmarker: the same 468 mesh points in the same order,
plus ten iris points. Everything else — the detector, the ROI, the drawing edges — is
unchanged, so switching is a one-word change.
Following MediaPipe, the result stays a flat array and region membership lives in named constants:
from uniface import SCRFD, FaceMesh
from uniface.constants import FaceMeshWeights
from uniface.landmark import IRIS_LEFT, IRIS_RIGHT, NUM_MESH_LANDMARKS

mesher = FaceMesh(model_name=FaceMeshWeights.V2_478)
result = mesher.predict(image, SCRFD().detect(image))[0]

result.landmarks.shape                  # (478, 3)
result.landmarks[:NUM_MESH_LANDMARKS]   # the 468 mesh points, as V1_468 returns them
result.landmarks[IRIS_LEFT]             # (5, 3) — center, right, top, left, bottom
result.landmarks[IRIS_RIGHT]            # (5, 3)

left_pupil = result.landmarks[IRIS_LEFT][0, :2]
Each iris is ordered center-first, so the mean distance from point 0 to the other four gives the iris radius. A human iris is close to 11.7 mm across regardless of the person, which makes that radius usable as a scale reference for real-world distance.
V2_478 runs at 256×256 against V1_468's 192×192 — 113 against 35 MMac. The
wall-clock gap is narrower than that ratio since neither model saturates a modern CPU,
so benchmark your own target. It is an addition, not a replacement: stay on V1_468
unless you need the irises.
Drop-in Use
FaceMesh implements the same interface as Landmark106 and PIPNet, so it can be
swapped into existing code that expects 2D points:
MediaPipe Parity
Seeding the mesh with BlazeFace — the detector MediaPipe uses internally — reproduces MediaPipe's own output:
from uniface import BlazeFace, FaceMesh

detector, mesher = BlazeFace(), FaceMesh()
results = mesher.predict(image, detector.detect(image))
Visualization
from uniface.draw import draw_mesh

draw_mesh(image, results[0].landmarks)                 # 'partial': contours + points
draw_mesh(image, results[0].landmarks, mode='full')    # dense 2556-edge tessellation
draw_mesh(image, results[0].landmarks, mode='points')  # points only
Use partial or points for video
mode='full' issues 2556 line draws per face. It is the most detailed view but
noticeably slower — prefer the other two for real-time work.
Notes
- The crop follows MediaPipe's ROI rule: a square region at 1.5× the detector box,
rotated so the eye line is horizontal. Tune it with
margin=if the mesh clips. - Passing
Faceobjects roll-normalizes the crop automatically. With barebboxesthe crop is axis-aligned, which degrades the mesh on tilted heads. roi_from_boxandwarp_roiare public, so you can build MediaPipe's video-mode ROI tracking (ROI from the previous frame's mesh) on top of the model.scoresaturates near 1.0 for anything plausible. It confirms the model ran; it is not a discriminative confidence, so do not threshold on it.
5-Point Landmarks (Detection)
All detection models except BlazeFace provide 5-point landmarks. BlazeFace returns 6
MediaPipe keypoints instead, so its supports_alignment is False; see
Detection.
from uniface.detection import RetinaFace

detector = RetinaFace()
faces = detector.detect(image)

if faces:
    landmarks_5 = faces[0].landmarks
    print(f"Shape: {landmarks_5.shape}")  # (5, 2)

    left_eye = landmarks_5[0]
    right_eye = landmarks_5[1]
    nose = landmarks_5[2]
    left_mouth = landmarks_5[3]
    right_mouth = landmarks_5[4]
Visualization
Draw 106 Landmarks
import cv2

def draw_landmarks(image, landmarks, color=(0, 255, 0), radius=2):
    """Draw landmarks on image."""
    for x, y in landmarks.astype(int):
        cv2.circle(image, (x, y), radius, color, -1)
    return image

# Usage
landmarks = landmarker.get_landmarks(image, face.bbox)
image_with_landmarks = draw_landmarks(image.copy(), landmarks)
cv2.imwrite("landmarks.jpg", image_with_landmarks)
Draw with Connections
def draw_landmarks_with_connections(image, landmarks):
    """Draw landmarks with facial feature connections."""
    landmarks = landmarks.astype(int)

    # Face contour (0-32)
    for i in range(32):
        cv2.line(image, tuple(landmarks[i]), tuple(landmarks[i+1]), (255, 255, 0), 1)

    # Left eyebrow (33-41)
    for i in range(33, 41):
        cv2.line(image, tuple(landmarks[i]), tuple(landmarks[i+1]), (0, 255, 0), 1)

    # Right eyebrow (42-50)
    for i in range(42, 50):
        cv2.line(image, tuple(landmarks[i]), tuple(landmarks[i+1]), (0, 255, 0), 1)

    # Nose (51-62)
    for i in range(51, 62):
        cv2.line(image, tuple(landmarks[i]), tuple(landmarks[i+1]), (0, 0, 255), 1)

    # Draw points
    for x, y in landmarks:
        cv2.circle(image, (x, y), 2, (0, 255, 255), -1)

    return image
Use Cases
Face Alignment
from uniface.face_utils import face_alignment

# Align face using 5-point landmarks
aligned, _ = face_alignment(image, faces[0].landmarks)
# Returns: (112x112 aligned face, inverse transform matrix)
Eye Aspect Ratio (Blink Detection)
import numpy as np

def eye_aspect_ratio(eye_landmarks):
    """Calculate eye aspect ratio for blink detection."""
    # Vertical distances
    v1 = np.linalg.norm(eye_landmarks[1] - eye_landmarks[5])
    v2 = np.linalg.norm(eye_landmarks[2] - eye_landmarks[4])

    # Horizontal distance
    h = np.linalg.norm(eye_landmarks[0] - eye_landmarks[3])

    ear = (v1 + v2) / (2.0 * h)
    return ear

# Usage with 106-point landmarks
left_eye = landmarks[63:72]  # Approximate eye points
ear = eye_aspect_ratio(left_eye)

if ear < 0.2:
    print("Eye closed (blink detected)")
Head Pose Estimation
import cv2
import numpy as np

def estimate_head_pose(landmarks, image_shape):
    """Estimate head pose from facial landmarks."""
    # 3D model points (generic face model)
    model_points = np.array([
        (0.0, 0.0, 0.0),       # Nose tip
        (0.0, -330.0, -65.0),  # Chin
        (-225.0, 170.0, -135.0),  # Left eye corner
        (225.0, 170.0, -135.0),   # Right eye corner
        (-150.0, -150.0, -125.0), # Left mouth corner
        (150.0, -150.0, -125.0)   # Right mouth corner
    ], dtype=np.float64)

    # 2D image points (from 106 landmarks)
    image_points = np.array([
        landmarks[51],   # Nose tip
        landmarks[16],   # Chin
        landmarks[63],   # Left eye corner
        landmarks[76],   # Right eye corner
        landmarks[87],   # Left mouth corner
        landmarks[93]    # Right mouth corner
    ], dtype=np.float64)

    # Camera matrix
    h, w = image_shape[:2]
    focal_length = w
    center = (w / 2, h / 2)
    camera_matrix = np.array([
        [focal_length, 0, center[0]],
        [0, focal_length, center[1]],
        [0, 0, 1]
    ], dtype=np.float64)

    # Solve PnP
    dist_coeffs = np.zeros((4, 1))
    success, rotation_vector, translation_vector = cv2.solvePnP(
        model_points, image_points, camera_matrix, dist_coeffs
    )

    return rotation_vector, translation_vector
Available Landmarkers
from uniface.constants import FaceMeshWeights, PIPNetWeights
from uniface.landmark import FaceMesh, Landmark106, PIPNet

# Default: 106-point InsightFace model
landmarker = Landmark106()

# 98-point PIPNet (WFLW)
landmarker = PIPNet()

# 68-point PIPNet (300W+CelebA)
landmarker = PIPNet(model_name=PIPNetWeights.DW300_CELEBA_68)

# 468-point dense 3D mesh (MediaPipe Face Mesh)
landmarker = FaceMesh()

# 478-point dense 3D mesh with irises (MediaPipe Face Landmarker)
landmarker = FaceMesh(model_name=FaceMeshWeights.V2_478)
See Also
- Detection Module - Face detection with 5-point landmarks
- Attributes Module - Age, gender, emotion
- Gaze Module - Gaze estimation
- Concepts: Coordinate Systems - Landmark formats
- CLI Tools - Command-line scripts for all UniFace modules